


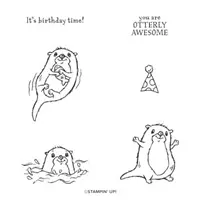
Hands down, the Awesome Otters FREE Sale-a-bration stamp set is my favorite stamp set in the catalog! I created this Awesome Otter under water card using the FREE stamp set and the Sea Dies.

The underwater scene comes to life by blending some Coastal Cabana ink on the Basic White paper behind the die-cut from the Sea Dies. Full measurements and instructions are posted below, but I’ve also provided a video from my Facebook Live from 1-12-22 incase you would rather watch and listen instead of read.
Measurements:
- Bermuda Bay: 4-1/4” x 11” scored at 4-1/4”
- Coastal Cabana: 4” x 5-1/4”
- Basic White: 3-3/4” x 5” for card front, 4” x 5-1/4” for card inside and 2” x 3” for otter
Instructions:
- Use a Blending Brush and Coastal Cabana Ink to create shades of blue on the 2nd largest Basic White piece.
- Stamp the sentiment in Memento ink near the top edge as shown, then attach this to the card front with Stampin’ Seal
- Die cut the “underwater scene” from the Coastal Cabana piece of cardstock using the Sea Dies
- Using a clean Blending brush for each ink pad, blend Old Olive Ink over the grasses and Flirty Flamingo over the coral.
- Color over the coral with Wink of Stella. Once this is dry, apply Stampin’ Dimensionals to the back of the die-cut piece and attach to the front of the card
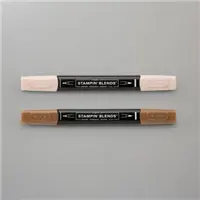
- Stamp the otter with Memento ink on the smallest Basic White piece and color him in with Ivory Stampin’ Blends for the belly and face and Bronze for the body. Color the fish with Pool Party and the nose with Basic Black leaving a bit of white showing on his nose. Then fussy cut the image and attach it to the card with Dimensionals.
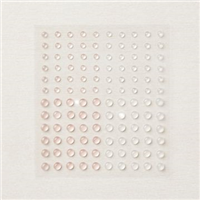
- Add 3 of the clear Polished Dots above the otter to resemble bubbles
- For the inside of the card stamp the Otter with Memento ink on the largest Basic White piece and color it the same as above, then use a Blending Brush and Coastal Cabana Ink to create shades of blue and attach it to the inside of the card
If you are unable to view the video, please CLICK HERE

PLEASE NOTE: My Wednesday Facebook Live Videos will be moving to 6:00 CT starting next Wednesday, January 19th. You can find my Facebook live HERE
Supply List to Make Today’s Card


CURRENT HOST CODE: Use this host code to place your online order. If your order is over $150 DO NOT use the code – you’ll get your own Stampin’ Rewards from Stampin’ Up! and you’ll still get the project tutorials from me. Just copy/paste this code: 6GMJKWNQ when placing your order.
FOLLOW ME….
Facebook: https://www.facebook.com/tinasstampinstudio/
Pinterest: https://www.pinterest.com/tinarappe/stampin-studio-creations/
Sign up for my Newsletter: https://stampinstudio.com/subscribe


