


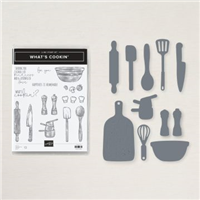
My husband is gone to a conference for a few days, so I spent a wonderful weekend in my Stampin’ Studio. I had a blast playing with the What’s Cookin’ stamp set. The possibilities are endless with this stamp set and the coordinating Cookin’ Dies. It kind of felt like playing with paper dolls.

I wanted the card to look like a table and table cloth with patterned wall paper in the background. Popping the different elements up makes it appear more realistic.

Measurements:
- Basic White Thick: 4-1/4” x 11” scored at 5-1/2”
- Misty Moonlight: 4” x 5-1/4”
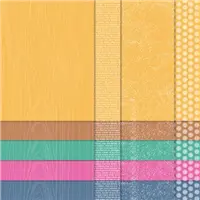
- In Good Taste DSP (woodgrain): 3-3/4” x 2-1/4” and 2-1/2” x 2-1/4”
- 2020-2022 In Color DSP (Misty Moonlight plaid) 2-3/4” x 2-3/4”
- 2020-2022 In Color DSP (Misty Moonlight flower print) 3-3/4” x 2-3/4”
- Basic White: 3” x 3” and 3” x 4-1/4”
Instructions:
- Fold card base in half on score line and attach Misty Moonlight layer to front of card with Stampin’ Seal Adhesive
- Attach Misty Moonlight flower print to top of Misty Moonlight cardstock and large In Good Taste DSP woodgrain print to lower edge
- Use 2nd largest die from Scalloped Contours Dies to cut “lace edge” of tablecloth from 3” x 3” piece of Basic White, then cut this in half on the diagonal
- Cut plaid piece in half on the diagonal and attach to lace edge of tablecloth. Attach these layers to card front with Stampin’ Dimensionals
- Stamp sentiment in Memento ink on small woodgrain print and die cut it with frame from Tasteful Labels Dies, then draw a line around the edge of the label with Dark Cherry Cobbler Stampin’ Blend and attach label to card with Dimensionals
- On remaining Basic White piece stamp “bowl” in Smoky Slate, “saltshaker” in Soft Suede and “spoon” in Soft Suede (stamped off once), then cut each of these out using the dies from the Cookin’ Dies
- Color the band on the bowl with the Dark Cherry Cobbler Stampin’ Blend.
- Using the paper trimmer, cut a small slit in the rim of the bowl and insert the spoon through the slit.
- Attach bowl and saltshaker to the card using Dimensionals.
Don’t forget that Sale-a-bration is going on now through September 30th. You’ve got just over 7 weeks to earn some fabulous products. CLICK HERE if you’re unable to view the video
You can order the supplies for today’s card by clicking the products below which will take you directly to my online store.


 CURRENT HOST CODE: Use this host code to place your online order. If your order is over $150 DO NOT use the code – you’ll get your own Stampin’ Rewards from Stampin’ Up! and you’ll still get the project tutorials from me. Just copy/paste this code: FGJ4UANN when placing your order.
FOLLOW ME….
Facebook: https://www.facebook.com/tinasstampinstudio/
Pinterest: https://www.pinterest.com/tinarappe/stampin-studio-creations/
Sign up for my Newsletter: https://stampinstudio.com/subscribe


