Whiskey Business

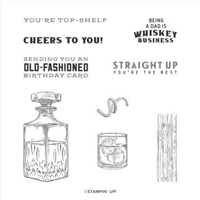
Yesterday was my husband, Dave’s, birthday, so I made him this card to celebrate his day!  The Whiskey Business stamp set was the prefect stamp set for him and I believe it makes for a great masculine card.  What do you think?

Stampin' Up! Whiskey Business stamp set, Stampin' Studio

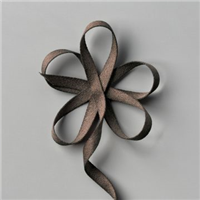
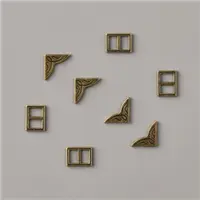
I paired the stamp set with the In Good Taste Designer Series Paper and embellished the card with the Antique Slides & Corners and the Faux Suede Ribbon.

Measurements:  

  • Early Espresso: 8-1/2” x 4-1/2” and 3-1/2” x 3- ¾”
  • In Good Taste Designer Series Paper: 4” x 5-1/4” and 3-1/4” x 3-1/2” and 1-1/2” x 1-1/2”
  • Early Espresso Faux Suede Ribbon: 6”

Instructions: 

  • Stamp bottle and one glass on medium piece of the wood grain pattern from the In Good Taste Designer Series Paper and one glass on the smallest piece with Memento Ink. Color in the beverage with dark Cinnamon Cider Stampin’ Blends.  Use color Lifter to highlight areas of the beverage. Next attach this piece to the smaller Early Espresso piece with Stampin’ Seal.
  • Use Paper Snips to cut out the single glass and attach it with Stampin’ Dimensionals to the medium wood grain print as shown.
  • Thread the Antique Slide onto the Early Espresso Faux Suede Ribbon and wrap it around the lower edge of the largest woodgrain and attach the ends to the backside with Mini Glue Dots. Next attach this piece to the card front with Stampin’ Seal.
  • Attach the stamped layers to the card front with Stampin’ Dimensionals.
  • Stamp the sentiment above the stamped images in Early Espresso Ink.

Supplies used on this card can be ordered below by clicking on the photos

&

Supply List

Thank you for taking time to visit my blog, for shopping with me and for your loyalty to Stampin’ Studio!  I know there are a lot of demonstrators out there to choose from… THANK YOU for choosing me!  To show my appreciation, I have something special for you!  When you use the Host Code on your order, you earn rewards from me! 

Place an order of $30 or more using my current host Code and you’ll receive 4 card project tutorials that you will not see featured on my blog.

CURRENT HOST CODE: Use this host code to place your online order.  If your order is over $150 DO NOT use the code – you’ll get your own Stampin’ Rewards from Stampin’ Up! and you’ll still get the project tutorials from me.  Just copy/paste this code: PTCRQRX6 when placing your order.


FOLLOW ME….

Facebook: https://www.facebook.com/tinasstampinstudio/ 

Pinterest: https://www.pinterest.com/tinarappe/stampin-studio-creations/

Sign up for my Newsletter: https://stampinstudio.com/subscribe

Playful Pets Fun Fold Card

Today’s card is a great one for any friend or pet lover.  It’s a Playful Pets Fun Fold Card and believe it or not, there’s no stamping at all on this card!  That’s right, the adorable dog is one of the prints found in the Playful Pets Designer Series Paper and the “friend” die-cut is from the Well Written Dies.

Stampin' Up! Playful Pets DSP, Pet's Dies, Fun Fold, Stampin' Studio

Color Combo

Let’s take a closer look at the “Fun Fold” part of the card.  The outer part of the card (Real Red) is the normal card size, then there’s a smaller White insert with a Z-fold and on top of that is a framed area that is cut out with the Stitched So Sweetly Dies.  It’s atached only to the right side of the Z-fold, so that when the card is closed, it fits within the card front cut out.

Stampin' Up! Playful Pets DSP, Pet's Dies, Fun Fold, Stampin' Studio

Measurements:

Real Red: 8-1/2″ x 5-1/2″ scored at 4-1/4″ and a scrap for the die-cut word friend

Basic White: 8″ x 5-1/4″ scored at 4″ & 6″ and 2-1/2″ x 3-1/2″ for die-cut rectangle

Basic Black: 2-3/4″ x 3-3/4″ for die-cut rectangle and 2-1/2″ x 1″ 

Playful Pets Designer Series Paper: and dog or cat image

Playful Pets Trim Combo: 18″

Instructions:

  • Use second from the largest scalloped rectangle from the Stitched So Sweetly Dies to cut a rectangle from the center of the front of the card, Then run the front of the card through the Tasteful Textiles Embossing Folder.
  • Fold large Basic White piece on score lines to create a Z-fold with the 4″ section on the left.  Use the Pets Dies to cut “paws” from the lower left part of  the Basic White Z-fold piece and attach the small Basic Black piece behind this.
  • Attach z-fold piece to the inside of the Real Red card base.
  • Cut a rectangle from the large Basic Black piece using the second from the largest scalloped rectangle from the Stitched So Sweetly Dies.
  • Cut a rectangle from the small Basic White piece using the third from the largest scalloped rectangle from the Stitched So Sweetly Dies and attach this piece to the Basic Black rectangle.
  • Use scissors to fussy cut the pet from the Playful Pets Designer Series Paper and attach to the Basic White rectangle with Stampin’ Dimensionals.
  • Cut “friend” from the scrap of Real Red cardstock using the Well Written Dies and attach to the white piece with Mini Glue Dots
  • To attach the “framed pet” piece to the card, fold the Basic White piece in to the Z-fold and close the card so that you can see the White piece through the “window” in the front of the card.  Place adhesive on the RIGHT SIDE ONLY of the “framed pet” piece, and with the card closed line the framed pet up with the window on the front and secure the piece to the z-fold inside.
  • Open card and wrap the Black & White Bakers Twine from the Playful Pets Trim Combo around the fold and tie it in a knot on the front of the card.  Slide a Playful Pets Trinket on the twine and tie it in a bow.

Supplies used on today’s card can be found by clicking the photos below

Thank you for taking time to visit my blog, for shopping with me and for your loyalty to Stampin’ Studio!  I know there are a lot of demonstrators out there to choose from… THANK YOU for choosing me!  To show my appreciation, I have something special for you!  When you use the Host Code on your order, you earn rewards from me! 

Place an order of $30 or more using my current host Code and you’ll receive 4 card project tutorials that you will not see featured on my blog.

CURRENT HOST CODE: Use this host code to place your online order.  If your order is over $150 DO NOT use the code – you’ll get your own Stampin’ Rewards from Stampin’ Up! and you’ll still get the project tutorials from me.  Just copy/paste this code: PTCRQRX6 when placing your order.


FOLLOW ME….

Facebook: https://www.facebook.com/tinasstampinstudio/ 

Pinterest: https://www.pinterest.com/tinarappe/stampin-studio-creations/

Sign up for my Newsletter: https://stampinstudio.com/subscribe

Well Suited Suite for Masculine Cards

If I’ve heard it once, I’ve heard it dozens of times…masculine cards or cards for the men in our lives are difficult to make.  Well, not anymore my friend!  Now we’ve got the Well Suited Suit for masculine cards which has some masculine images with coordinating dies, great sentiments and wonderful designer series paper that make it all so easy.

Stampin' Up! Well Suited Suite, Handsomely Suited Bundle, Stampin' Studio

Well Suited Suite is just $66 for everything shown below.  That includes a 10% savings on the Handsomely Suited stamp set and Suite & Tie Dies.

Stampin' Up! Well Suited Suite, Handsomely Suited Bundle, Stampin' Studio

Measurements

  • Thick Basic White: 5-1/2” x 8-1/2” for card base and 3” x 3” for die cut
  • Basic Gray: 4” x 5-1/4” and 3” x 3” for die cut
  • Smoky Slate: 2” x 1-1/4”
  • Well Suited DSP: Pinstripe print- 3-3/4” x 3” Polka dot print- 3-3/4” x 2”
  • Well Suited Twine (Basic Gray) 20” 

Instructions:

  • Fold the large Thick Whisper White piece in half for the card base.
  • Attach pinstripe print to the lower part of the large Basic Gray piece of cardstock leaving a border around the sides and the bottom.
  • Attach polka dot print to the top part of the Basic Gray piece of cardstock leaving a border around the sides and the top.
  • Wrap twine around the cardstock where the 2 pieces of designer paper meet securing the ends of the twine to the back with Stampin’ Seal, then secure the Basic Gray piece to the card front.
  • Cut Layered Circle from Basic Gray using 2nd largest die.
  • Cut Stitched Shapes Circle from small Whisper White using 2nd largest die, then stamp sentiment with Basic Gray ink near the top of the circle.
  • Attach the circle to the card front with Stampin’ Dimensionals.
  • Stamp the bow on Smoky Slate piece with Basic Gray ink and cut it out with Suite & Tie Dies.
  • Attach the tie to the card under the sentiment with Stampin’ Dimensionals.

Sale-a-bration is almost over, you’ve got until February 28th to stock up on all the free product found in the Sale-a-bration Catalog.  Free Sale-a-bration product of your choice with every $50 in product purchased.

Stampin' Up! Sale-a-bration 2021, Stampin' Studio

Supplies used on today’s card can be found by clicking the photos below

Thank you for taking time to visit my blog, for shopping with me and for your loyalty to Stampin’ Studio!  I know there are a lot of demonstrators out there to choose from… THANK YOU for choosing me!  To show my appreciation, I have something special for you!  When you use the Host Code on your order, you earn rewards from me! 

Place an order of $30 or more using my current host Code and you’ll receive 4 card project tutorials that you will not see featured on my blog.

CURRENT HOST CODE: Use this host code to place your online order.  If your order is over $150 DO NOT use the code – you’ll get your own Stampin’ Rewards from Stampin’ Up! and you’ll still get the project tutorials from me.  Just copy/paste this code: PTCRQRX6 when placing your order.


FOLLOW ME….

Facebook: https://www.facebook.com/tinasstampinstudio/ 

Pinterest: https://www.pinterest.com/tinarappe/stampin-studio-creations/

Sign up for my Newsletter: https://stampinstudio.com/subscribe