Home to Roost

As we’re winding down on the last few days of sale-a-bration, I thought I’d share a card designed by my friend Brandi Barnard.  It features the Home to Roost Sale-a-bration stamp set which you can choose for free with a $50 purchase.

Stampin' Up! Home to Roost stamp set, sale-a-bration 2019, Stampin' Studio

Color Combo

This card is such an easy card, you can create a bunch to have on hand for anytime you want to send a quick note.  It starts with a Poppy Parade card base with a piece of Bermuda Bay attached to the lower edge and some of the Black & white gingham print fro the Sale-a-bration Botanical Butterflies Designer Series Paper.  Next is some of the Braided Linen Trim to add a bit more of the country look.  The rooster is stamped in Memento ink on Whisper White cardstock then colored in with Stampin’ Blends; Dark Smoky Slate, Dark Cajun Craze, Dark Mango Melody, Dark Poppy Parade, Dark Bermuda Bay and Light Crumb Cake.

Supplies Used on Today’s Card

Painted Seasons Succulents

I’ve got another card I created that uses the Painted Seasons stamp set, coordinating Painted Seasons Designer Series paper and the coordinating Four Seasons Framelits.  If you’ve been in the stores at all over the last year or so, you’ve probably notices that succulent plants are everywhere these days.  You’ll find them on clothing, in home decor, in prints…literally everywhere.  So, why not feature it on a greeting card?!

Stampin' Up! Painted Seasons stamp set, Painted Seasons Designer Series Paper, Four Seasons framelits, Sale-a-bration 2019, Stampin' Studio

Color Combo

I started with a card base of Pool Party that measures 4-1/4″ x 11″ scored at 5-1/2.  The Painted Seasons Designer Series Paper was cut  3-1/2″ x 4-1/2″ and attached to the center of the card front with Snail Adhesive.  Next I used the largest and 4th largest of the Stitched Rectangle Framelits to cut out the “frame: from Whisper White cardstock, then I ran it through the Big Shot with the Basket Weave Embossing Folder.  The was attached to the front of the card with lots of Stampin’ Dimensionals.  I stamped the sentiment from the “Incredible Like You” stamp set in Pool Party on a Whisper White banner that measures 1″ x 3-1/4″ and attached it with Dimensionals.  The succulents were stamped in Lemon Lime Twist and again in Pool Party and the leaves were stamped in Lemon Lime twist, then all of these were cut out using the Four Seasons Framelits and attached with Dimensionals.  The finishing touch was the pearls I added to the banner and succulents.

The Painted Seasons stamp set, Painted Seasons Designer Series Paper and the Four Seasons Framelits are only available until March 31st, so time is running out if you want to get your hands on these pretties.

Supplies used on today’s card


Make it Christmas with the Painted Seasons Bundle

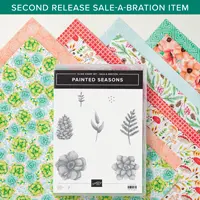
Here in Wisconsin, we have all been praying for winter to stop and for spring to get here already! Finally, the snow is nearly all gone, the weather is getting warmer, birds are starting to come back again, and now I go and post a Christmas card!!!!  What?!  Okay, I know this is crazy to post a Christmas card this time of year, but I just had to show you how pretty one of the prints from the Painted Seasons Designer Series Paper is.  

Stampin' Up! Painted seasons bundle, Four seasons Framelits, Stampin' Studio

I also didn’t want you to miss it or the stunning pine cone and pine boughs from the Painted seasons Bundle (which is only available through the end of March).  Never did I dream that I’d be making Christmas cards in March!  With gorgeous products like this, why not?  It’s never too soon to start.

Measurements

  • Poppy Parade: 5 1/2″ x  7 1/2″ —  score at 4 1/4″, 2-1/4” x 4” – score at 1/2”          
  • Early Espresso: 3” x 5 1/4”
  • Whisper White: 4” x 5 1/4″, 2″ x 3-1/4″, 2” x 4″
  • Crumb Cake: 2″ x 2″
  • Painted Seasons DSP: 2 7/8” x 5 1/8”

 Instructions:

  • Fold Poppy Parade card base at score line.
  • Attach Early Espresso to smaller section with Snail Adhesive.
  • Attach Painted Seasons Designer Paper to Early Espresso layer.
  • Fold smaller Poppy Parade on score line. Attach 1/2″ flap to back of 4” x 5 1/4″ Whisper White (the larger end will fold over the front of the card).
  • Attach the Whisper White layer inside the card.
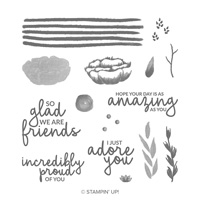
  • Stamp greeting with Early Espresso ink  and Poppy Parade ink on the 2″ x 3-1/4″ Whisper White and attach to the front flap of card
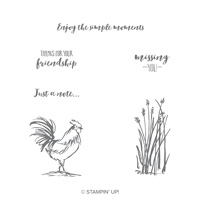
  • Stamp pine boughs with Shaded Spruce ink on the 2″ x 4″ Whisper White piece and stamp pine cone on Crumb Cake with Early Espresso.
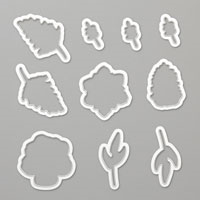
  • Cut out pine cone and pine boughs using the Four Seasons Framelits.
  • Attach Pine Boughs by the greeting with Snail Adhesive
  • Attach pine cone over the pine boughs with Dimensionals.

Stampin' Up! Painted seasons bundle, Four seasons Framelits, Stampin' Studio

Here’s another card using the same colors and products and layout.  My sister Peggy gave me this card, and since I loved everything about it, I thought I’d just switch out the stamps and recreate it.  So, what do you think?

Don’t forget Sale-a-bration ends on March 31st!

Get your free product before time runs out