Snowflake Sentiments Bundle with Shimmer & Shine

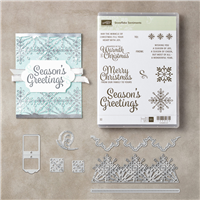
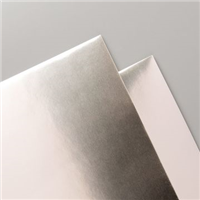
Metallic finishes are very much on trend and you see them everywhere these days.  So why not on our holiday greeting cards?  I used the Champagne Foil Paper as the metallic of choice on today’s card and I couldn’t be happier with the way it turned out.  The card base is Whisper White Thick card stock which I ran through the Big Shot with the “pierced edged die” from the Swirly Snowflakes Thinlits.  It cuts the scalloped edge and the pierced holes at the same time.  How sweet is that? On the inside of the card I attached a 1″ wide strip of the Champagne Foil Paper so that you see the foil when the card is closed.  On the front of the card I added some of the Year of Cheer Specialty Designer Series Paper which has metallic snowflakes printed on it.  I went back to the Champagne Foil and the Swirly Snowflakes Thinlits again and cut out the very delicate row of snowflakes and the little snowflake accent.  I attached them with the Multi-purpose Glue.    Isn’t it stunning the way the row of metallic snowflakes fits so perfectly within the border of the pierced edge?  I added a band of Year of Cheer Specialty Designer Series Washi Tape and the final touch was stamping the sentiment from Snowflake Sentiments in Smoky Slate Ink and punching it out with the Pretty Label Punch. 

Here’s a little Tip for You:  To get the Foil Layer behind the stamped Pretty Label piece, I punched a label from the Champagne Foil paper and cut it in half length-wise, and then positioned the split label behind the stamped image with Fast Fuse.

If you love this card as much as I do and you want to make it, don’t forget to order the stamp set and Thinlits together in the Snowflake Sentiments Bundle because it will save you 10%, and we all love to save money, right?

Click the photos to order the supplies

Stampin’ Blends have arrived!

Stampin' Up! Stampin' Blends, Stampin' Studio

Say hello to a world of colorful creativity with Stampin’ Blends premier alcohol markers.  These high quality, dual tip markers come in 12 exclusive Stampin’ Up! colors, each with a light and dark shade.  Not an artist?  You are now!  These markers make it so easy to blend and create lovely works of art.

Blend With Ease

  • I’ve found the best results when I stamp the line image with Tuxedo Black Memento Ink on Whisper White card stock.
  • Use light and dark shades of the same color to fill the image.  You can also experiment with blending other colors with similar hues.
  • Use the brush tip to color in the larger images and the fine tip for the details.
  • Use the color lifter if you want to soften the colors, add texture clean up edges and create highlights.

Stampin' Up! Stampin' Blends, Stampin' Studio

Look at all of the beautiful shading you can get with Stampin’ Blends.  The pumpkins and gourds in the basket almost look 3 dimensional with the shading.

Stampin' Up! Stampin' Blends, Stampin' Studio

This little deer looks so much cuter with high lights and low lights.  His personality seems to come to life.

Stampin' Up! Stampin' Blends, Stampin' Studio

Notice how the variations of purple in the flower really enhances it’s beauty.

Not only are there 12 exclusive colors of Stampin’ Blends Markers which can be ordered individually or in a combo pack, there are also Ivory and Bronze Stampin’ Blends and a Color Lifter each sold separately, or you can get the full Stampin’ Blends Collection.  Wait, there’s more….There’s the Color Me Happy stamp set and the Color Me Happy Project Kit which are both perfect for use with the Stampin’ Blends.

Order Your Stampin’ Blends Products

Trick or Treat Mini Pizza Box

Stampin' Up! Spooky Cat stamp set, Mini Pizza Boxes, Stampin' Studio

Happy Halloween!  This adorable Mini Pizza Box is one I made last month while on a cruise where we did stamping and paper crafting.  Fellow demonstrator Jenn Gulch designed this box.  It was so simple to create using the Mini Pizza Box which holds a Reese’s Peanut Butter Cup (my favorite) nicely.  The Spooky Night Designer Series Paper made the background super simple as the tree and the moon on the orange background are one of the prints in the paper package.  All I did was stamp the owl from the Spooky  Cat stamp set, color in the beak and feet with a marker and add the Black Rhinestone eyes.  The adorable witches hat is another on of the prints in the Spooky Night DSP.  We added the sentiment and little cobwebs in the corners (also from the Spooky Cat stamp set) and finished it off with a bit of Vintage Crochet Trim.

Today is your last chance to stock up on some of the best Designer Series Paper at an incredible savings.  When you buy three package of those on the list, you get a forth one for free!

To view a flyer with all of the papers included in this offer please click  HERE

Supply List for the Halloween Treat Box