Nobel Peacock Foil Sheets

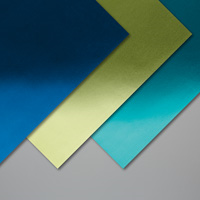
Have you seen the Nobel Peacock Foil Sheets in the Annual Catalog?  They are gorgeous and they make some stunning accents on cards.  Check out this one I made using the Beads & Baubles Embossing Folder with the Foil Sheets to add some incredible detail to the Foil Sheets.  I paired the Foil Sheets with the Free As a Bird stamp set.

Stampin' Up! Free as a Bird stamp set, Nobel Peacock Foil Sheets, Stampin' Studio

In order to have a cohesive look, I colored the images with the same color as the Foil Sheets. 

Measurements

  • Old Olive: 4-1/4″ x 11″ score at 5-1/2″                
  • Whisper White: 4″ x 5-1/4″ and 3-1/2” x 2-1/4”
  • Basic Black: 3-1/2” x 2-1/8”
  • Noble Peacock Foil Sheets: 5” x 1-1/8” one each of Night of Navy, Pretty Peacock and Old Olive

 Instructions:

  • Attach large Whisper White piece to card front.
  • Run all three pieces of Noble Peacock Foil Sheets through Beads & Baubles Embossing Folder and attach to card front with Snail Adhesive.
  • Stamp bird image in Memento ink on smaller Whisper White and cut out with Stitched Rectangle Die
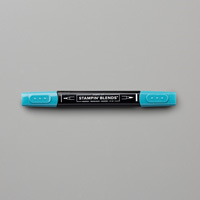
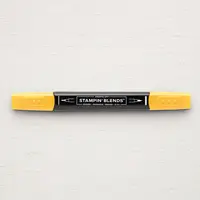
  • Color in stamped image with Stampin’ Blends: Bird Body-Night of Navy Combo, Leaves & Bird Heads-Old Olive, Flowers-Pretty Peacock, Branch-Crumb Cake, Beaks-Mango Melody. Be sure to blend the Night of Navy and Old Olive on the birds.
  • Attach stamped image to Basic Black with Snail Adhesive.
  • Place Stampin’ Dimensionals on the back of the Basic Black piece and attach to the card front.

 Over the next three days I’ll be sharing more cards that use the Nobel Peacock Foil Sheets as well as the Nobel Peacock Specialty Designer Series Paper, so be sure to come on back.  

Supply List

Magnolia Lane Suite – Day 4

This is it, Day 4 of my 4 part series featuring the Magnolia Lane Suite!  If you missed my other posts, you can see them by clicking the following links:

Day 1

Day 2

Day 3

Today’s card features nearly everything in the suite.

Stampin' Up! Magnolia Lane Suite, Good Morning Magnolia stamp set, Magnolia Memory Dies, Magnolia Lane DSP, Stampin' Studio

Let’s talk first about the black and white layers of card stock.  I started with the Whisper White cardstock that measured 3-3/8″ x 4-5/8″.  I laid a 3-1/4″ x 4-1/2 piece of card board on top and traced around it with a black Journaling Pen.  That’s what gives us the thin matted look.  The white was then layered on a 3-1/2″ x 4-3/4″ piece of Basic Black and a piece of the Magnolia Linen Ribbon was wrapped around it before attaching it to the Petal Pink card base with Stampin’ Dimensionals. For the focal feature I stamped large flower image in Memento ink, as that is the best ink to use when using the Stampin’ Blends Markers to prevent smearing or bleeding of the ink.  Next… you guessed it, I colored it with Petal Pink and Mossy Meadow Stampin’ Blends.  After cutting the image with the Magnolia Memory Die, I did a bit more cutting with my Paper Snips to remove the largest leaf .  I then placed that large leaf on the lower side of the flower and attached to the card with Dimensionals.  I  rearranged the leaf because I didn’t want the leaf to interfere with the ribbon and cork tag accents.  The tag is one of the Magnolia Lane Cork Embellishments which I stamped on with the Memento Ink.  I tied some of the Linen Thread trough the tag and tied it in a bow and attached the tag with a couple Mini Glue Dots.  To finish off the inside, I attached a 4″ x 5-1/4″ piece of Whisper White with a 3/4″ strip of the Magnolia Lane Designer Series Paper.

I had so much fun with this suite and the series and I hope you enjoyed it too.  If you would like me to do another 4 day series please let me know if there is a particular suite you’d like me to showcase.  I’m always up for suggestions.

Supply List


Magnolia Lane Suite- Day 3

It’s Day 3 and based on the shares and views I’ve been seeing on this series of posts, I take it you LOVE the Magnolia Suite as much as I do.  This card looks a little over the top, but when we break it down, it is really quite simple.  In fact, the only stamping on the card is the sentiment from the Good Morning Magnolia stamp set.  Everything else is the Magnolia Lane Designer Series Paper!

Stampin' Up! Magnolia Lane Suite, Good Morning Magnolia stamp set, Magnolia Memory Dies, Magnolia Lane DSP, Stampin' Studio

So, let me walk you through the steps to make this card.  I started with a 4-1/4″ x 11″ piece of Basic Black card stock.  I then used the scalloped edge die from the Magnolia Memory Dies to give the scalloped edge to the front flap of the card.  Next was a piece of Whisper White cardstock measuring 4″ x 5-1/4″ which was also cut with the scallop die, then the sentiment was stamped in Memento ink.  Next up is a piece of the Magnolia Lane DSP cut 4″ x 2-1/2″ attached to the Whisper White layer.  Before attaching the Whisper White layer to the card base, I tied a bow with the Magnolia Lane Linen Ribbon and wrapped the ends around to the back side and secured them with Mini Glue Dots.  The flower, which was cut from the same DSP is attached to the front with Stampin’ Dimensionals.  For the inside of the card, I attached a 4″ x 1-1/4″ piece of striped DSP to a 4″ x 5-1/4″ piece of Whisper White card stock.  

See what I mean that this really is pretty simple. Tomorrow is the 4th and final day of my Magnolia Suite Series, so I hope you’ll be coming back.  If you’d like to order any of the supplies to make this card, all you have to do is click on the pictures below, which will take you directly to my store.