Sailing Home for Graduation

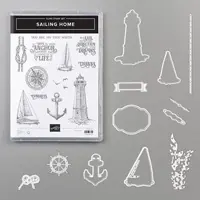
It’s graduation season and I love using the Sailing Home Bundle to create fun graduation cards.  The sentiment from the Sailing Home stamp set is great for graduation and I love the die that cuts out the fancy label the sentiment is mounted on.  
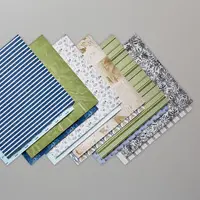
Stampin' Up! Sailing Home Bundle, Sailing Home stamp set, Smooth Sailing Dies, Come Sail Away DSP, Stampin' Studio

Color Combo

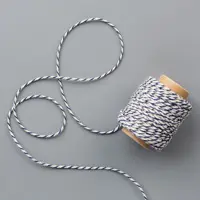
The Night of Navy card base is 4-1/4″ x 8-1/2″ and scored at 5-1/2″.  This leaves a half flap on the left of the card that opens.  I placed a 4″ x 5-1/4″ piece of Seaside Spray on the inside of the card, while the front flap got a 4″ x 2-2/4″ piece of Come Sail Away Designer Series Paper.  The sail boat and sea gulls were stamped in Night of Navy on a 2″ x 3-3/4″ piece of Seaside Spray.  I then colored the sails with the Stampin’ Write Chalk Marker and wrapped a piece of the Come Sail Away Bakers twine around the cardstock before popping it up on a 2-1/4″ x 4″ piece of Sahara Sand with Stampin’ Dimensionals and then layering on a 2-1/2″ x 4-1/4″ piece of Night of Navy.  This layers were then attached to the front of the card flap making sure not to attach it to the Seaside Spray inside layer.  The final touch was the sentiment stamped on Sahara Sand with Night of Navy and punched out with the 1-1/2″ Circle Punch and layered on a Night Of Navy stitched piece I cut out using the Smooth Sailing Dies.  This was popped up with Dimensionals as well.

Supply List for today’s card

To A Wild Rose Bundle

Years a go my Aunt Judy gave me a start from my Grandma’s Wild Rose plant.  It did well for a number of years but then it died…that is until the other day when I was clearing out a portion of my flower garden… It appears to be having a rebirth f sorts.  There are little buds, so I’m hopeful that maybe I’ll be getting some wild roses from my grandma.  I thought I’d share a card featuring the bundle called To A Wild Rose.  It features a 13 piece stamp set and coordinating Wild Rose Dies.

Stampin' Up! To A Wild Rose stamp set, Wild Rose Dies, To A Wild Rose Bundle, Stampin' Studio

Color Combo

I’ve been enjoying the new In Colors and decided to go with Purple Posy for this card.  The Card base is Purple Posy with a layer of Crumb Cake.  Next I added a piece of the Purple Posy In Color Designer Series Paper to the lower edge of a piece of Whisper White and added a piece of the Purple Posy Scallop Linen Ribbon.  This ribbon, available in all of the new In Colors, is so pretty; you’ve just got to see it in person.  The rose, which can be stamped in multiple layers with our 2-step stampin’, was stamped with Purple Posy ink (which is not available to order right now due to it foaming too much).  The outline was stamped full strength while the inside of the flower was stamped off once to provide a more muted shade of the Purple Posy.  I did the same thing with the leaves and Soft Sea Foam ink.  Both the flower and the leaves were cut out using the Wild Rose Dies.  That sure makes it quick and easy to do. After popping them up off the card with Stampin’ Dimensionals, I added the sentiment in Purple Posy.

You may order any of these items except the Purple Posy ink by clicking on the photos below.

It Starts With Art

There’s a stamp set and coordinating dies in the new catalog that is totally designed for the crafter in us all.  The “It Starts With Art Bundle” features a stamp set with the same name and coordinating Arts & Crafts Dies and is available at a 10% savings when purchased in the bundle.  But wait…there’s more…there is an entire suite of products, “Follow Your Art Suite” that coordinate with the bundle.  The Follow Your Art Designer Series Paper has fun crafty prints, there’s an embossing folder called Button Button that…you guessed it…embosses button images, there’s a fun package of Washi Tape that even has images of the Stampin’ Up! logo, a tiny shipping box to fill with fun treats and a fabulous Embellishment Kit.

Stampin' Up!, It starts With Art stamp set, Arts & Crafts Dies, Follow Your Art DSP, Stampin' Studio

Color Combo

I added texture on the Blueberry Bushel cardstock with the Button Button Embossing Folder and layered that on the Seaside Spray card base.  Look closely above and below the Follow Your Art DSP….do you see the ribbon?  I cut a piece of the Seaside Spray Linen Scalloped Ribbon in half the long way and tucked one piece under the top of the DSP and the other under the lower edge.  Next I stamped the bottle in Blueberry Bushel ink and colored over the image with Wink of Stella.  By painting it right over the ink, it pulls a little of the ink with it and that’s how I got a light blue sprkle to the bottle.  The sentiment embellishment was created by stamping the “scallop image two times and cutting it out with the Arts & Crafts Dies.  I then stamped the sentiment on one piece and layered them on top of one another with one piece vertical and one piece horizontal.  Both the sentiment and bottle are popped up with Stampin’ Dimensionals.  

Stampin' Up! Follow Your Art Suite, Stampin' Studio

There are so many fun things that can be created with the products in this suite.  Look at the incredible display my team member Amanda Waldhart made for a display at our demonstrator event last weekend.  Let’s take a closer look…

Stampin' Up! Follow Your Art Suite, Framed Art, Stampin' Studio Stampin' Up! Follow Your Art Suite, Stampin' Studio

Stampin' Up! Follow Your Art Suite, Stampin' Studio

You can order any of these supplies by clicking on the photos below