Big Shot Embossing Mats with the Foliage Frame Framelits

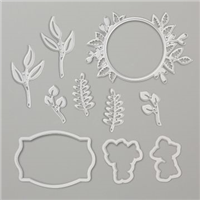
For today’s card, I used the Foliage Frame Framelits and the Big Shot Embossing Mats to achieve the details on the leaves of the frame.  I shared 2 other projects over the past 2 days that feature embossing with the Big Shot Mats, you can see them HERE and HERE.  The embossing on today’s card is a little bit different, so let me explain.

Stampin' Up! Foliage Frame Framelits, Big Shot Embossing Mats, Stampin' Studio

First I used the Foliage Frame Framelit in the “normal” way.  I created a sandwich by layering the Big Shot Platform and the Thin Die Adapter (which comes with the platform) then a clear Standard Cutting Pad, next my cardstock, the framelits (with cutting edge towards the cardstock) and another clear Standard Cutting Pad.  Once I ran this through the Big Shot I had the frame piece cut out.  Now, onto the embossing part…. If you look closely at the leaves of the frame, you’ll see the veins of the leaves.  To achieve this, we have to build a new sandwich.  Big Shot Platform, (no Thin Die Adapter this time), a clear Standard Cutting Pad, the frame die with cutting edge facing up, then then die cut piece of cardstock we previously cut out.  Make sure to fit it in the framelit exactly as it cut (you can hold this together on the cutting pad with a sticky note). Now layer on the thick Gray Silicone Rubber Mat and finally the White Impressions Pad.  Once you run it through the Big Shot, you’ve got the embossing on the leaves and you’re ready to put your card together.

Stampin' Up! Foliage Frame Framelits, Big Shot Embossing Mats, Stampin' Studio

I hope you’ll come back tomorrow as I’ve got one more card to share with you that also features the Big Shot Embossing Mats, and it’s my favorite.  It got many ooohs and aaaaah’s at my class last week.  Until then, Here’s the supply list for today’s card.

Supply List

Big Shot Embossing Mat & the Broadway Birthday Bundle

I’ve got another card I created with the Big Shot Embossing Mats.  I used the Broadway Birthday Bundle featuring the Broadway Lights Framelits and the Broadway Birthday stamp set.  The embossing was done in the same manner as the card I shared HERE yesterday.

Stampin' Up! Broadway Birthday Bundle, Big Shot Embossing Mat, Stampin' Studio

I stamped the sentiment with the Broadway Birthday stamp set and cut the Whisper White piece with the “marquee” framelit from the Broadway Lights Framelits. Take a close look and you can see the embossed “frame” around the Whisper White banner.  This was done with the same framelit.  I finished off the “marquee with alternating Clear & Red  Rhinestones.

Stampin' Up! Broadway Birthday Bundle, Big Shot Embossing Mat, Stampin' Studio

Supply List

Embossing with the Stitched Seasons Framelits

This is the final week for getting the Stitched Seasons Framelits and the Blended Seasons stamp set because this was a special offering from Stampin’ Up! only during the month of August!  Don’t miss out, this is such a gorgeous stamp set and framelits set.   We used the bundle at a class I held last week that show cased different ways to use the Big Shot Embossing Mats. 

Stampin' Up! Stitched Seasons Framelits, Blended Seasons stamp set, Embossing Mats, Stampin' Studio

When you look at the car, you can see the Pumpkin Pie “Label” cut out that has been stamped with the leaves from the Stitched Seasons Framelits.  Now, look closer and you’ll see the embossed stitching on the Mango Melody piece of cardstock.  That was done with the Big Shot Embossing Mats, isn’t it cool?  I’ll be sharing other projects I made using the Embossing Mats later in the week, but first let me share how to use the Embossing Mats.

Basic way to use the Big Shot Embossing Mats

  • Build a “sandwich” on the Big Shot Using the Big Shot Platform that comes with the Big Shot (do not us e the Thin Die Adapter)
  • Next place an acrylic pad on top of the Platform
  • Next place the die you’d like to emboss with (cutting side up)
  • Next place your cardstock
  • Now place the Blue Silicone Rubber Mat (you’re probably thinking “the framelit is going to cut the rubber”- don’t worry, it won’t!
  • Finally place the White Impressions Pad

When you run this through the Big Shot, it’s going to feel like nothing is happening, but trust me, its’ working.  When you remove the “sandwich from the Big Shot, you’ll find that your framelit has left a gorgeous embossed image in your cardstock.

Color Combo

Stampin' Studio Color Combo

Here you can see a close up of the embossed stitching as well as the leaf I cut out using the Stitched Seasons Framelits.  Don’t forget that when you order the Stitched Seasons Framelits and the Blended Seasons stamp set together as a bundle, you’ll save 10% plus, because Bonus Days are going on, you’ll also get a $5 coupon from Stampin’ Up! to use during September, good on any purchase.

Stampin' Up! Stitched Seasons Framelits, Embossing Mats, Stampin' Studio

Supplies Used