Round & Round stamping with Stamparatus & Ribbon of Courage stamp set

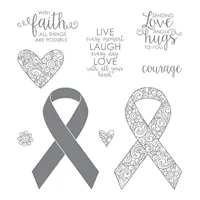
Today is my final post from my 4 ways to use your Stamparatus video.  This card features the Round & Round technique and the Ribbon of Courage stamp set.

Stampin' Up! Ribbon of Courage stamp set, Stamparatus round & Round stamping, Stampin' Studio

Color Palette

Stampin' Studio Color Palette

This card reminders me of images you see from the psychedelic 60’s & 70’s.  It was a little putzy with coloring each of the hearts with 5 different colors of markers, but I love the way it turned out.

Measurements:

Coastal Cabana Cardstock: 4-1/4″ x 11″ folded in half for the card base

Basic Black Cardstock: 4″ x 5-1/4″ and 3″ x 3″

Whisper White Cardstock: 5″ x 3-3/4″ and 4-1/2″ x 4-1/2″ to make the template as shown in the video (keep the die-cut square for stamping on).

Instructions:

Attach large Basic Black piece to card base with Snail Adhesive

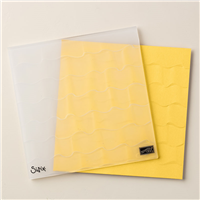
Emboss large Whisper White piece with Ruffled Embossing Folder and attach to card front with Snail

Die cut “template” with Layering Squares Framelits as shown in video and stamp the heart from Ribbon of Courage with Memento Ink using the Round & Round technique with the Stamparatus).  Stamp sentiment in the middle of the hearts with Memento ink.

Using Stampin’ Write Markers color each of the hearts with Coastal Cabana background, Flirty Flamingo flower petals, Granny Apple Green leaves, Mango Melody center of flowers, and Daffodil Delight flower ring around the center.

Attach stamped layer to small basic Black layer with Snail, then attach this to the card front using Stampin’ Dimensionals.

Supplies:

Varied Vases Hinge Stamping with the Stamparatus

I’m so thrilled you all loved my video 4 Ways to use your Stamparatus that I shared yesterday.  If you missed it, you can see it HERE  I am so in LOVE with all the techniques you can do with the Stamparatus.  As promised, I wanted to share details and a close up of one of the cards in the video.  This one features the Varied Vases stamp set along with the Hinge stamping technique with the Stamparatus.  Tomorrow I’ll be sharing the details on the “Round and Round” stamping technique so come on back.

Stampin' Up! Stamparatus, Varied Vases stamp set, Stampin' Studio

Color Palette

Stampin' Studio Color Palette

Measurements:

Lovely Lipstick Cardstock: 4-1/4″ x 11″ folded in half for the card base  and 1-1/4″ x 5-1/4″

Whisper White Cardstock: 4″ x 5-1/4″ and 1″ x 6″ for stamping and 1/2″ x 2-1/2″ for banner

Mossy Meadow Cardstock: 1-1/2″ x 5-1/4″

Instructions:

Emboss large Whisper White piece with Petal Burst Embossing Folder and attach to card base with Snail Adhesive

Stamp sentiment from Itty Bitty Greetings in Lovely Lipstick ink on smallest Whisper White piece, then trim notch into right edge to make banner.  Attach banner to card front as shown with Snail.

Stamp 1″ x 6″ piece of Whisper White as demonstrated on the video HERE then trim to 5-1/4″.  attach this to the Lovely Lipstick strip then layer on the Mossy Meadow piece.

Attach the layered strip to the card with Stampin’ Dimensionals.

Supplies:

4 ways to use your Stamparatus

Some of us were able to pre-order the Stamparatus a while back but as of June 1st this amazing stamp positioning tool has been available to everyone. Previously, I’ve shared a few different ways to use the Stamparatus ( you can see them by clicking HERE and HERE.   Today, I’ve got a video that shows 4 different ways to use the Stamparatus.

Stampin' Up! Stamparatus Techniques, Stampin' Studio

On Sunday, I showcased this card which uses Multi-Colored stamping with the Stamparatus and the video shows you how.  You can click HERE to get the measurements and supplies for this card.

Stampin' Up! Tuscan Vineyard stamp set, Stampin' Studio

I will also be showing 3 other cards in the video, so if you are unable to view the video below, please click HERE to watch it and learn some things you can do with your Stamparatus.  Scroll down after the video to get measurements and the supply list for the mirror stamping, then Thursday and Friday I’ll share measurements and supply lists for the other 2 cards.

If you enjoyed this video, I’d love for you to subscribe to my You Tube Channel, so you don’t miss any of my videos.

Measurements:

Old Olive Cardstock: 4-1/4″ x 11″ folded in half for the card base                                                              Early Espresso Cardstock: 5″ x 3-3’4″ and 4″ x 2-3/4″ for Scallop Oval                                                        Very Vanilla Cardstock: 4-3/4″ x 3-1/2″ embossed with Petal Burst embossing Folder                                    So Saffron Cardstock: 4-1/4″ x 2-3/4″ for stamping                                                                                  Share What You Love Designer Series Paper:1-3/4″ x 6″ scored at 1″ (this creates the banner that attaches to the back of the card and makes a flap over the front.

Supplies: