Alternative designs for the Perennial Birthday Project Kit

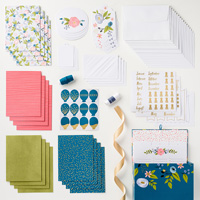
Have you checked out the Perennial Birthday project Kit on page 16 of the Occasions Catalog?  If you haven’t really looked at it, you need to do it now!  This kit is fabulous and I mean it.  It features a delightful box that you can fill with oodles and oodles of card you make yourself.  On top of that, you’ll never forget another birthday or special occasion because you can record the dates on the tabbed dividers that come in the box (one for each month).

Stampin' Up! Perennial Birthday Project Kit, Perennial Birthday stamp set, Stampin' Studio

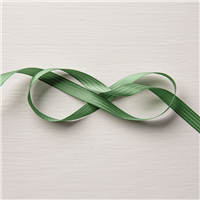
The kit also includes all of the supplies; card stock,  ribbon, twine, tags, banners, die cuts, embellishments and envelopes for 16 cards.  that’s 4 cards of each of these four designs.  Oh yeah, the directions also come in the kit.

Stampin' Up! Perennial Birthday Project Kit, Stampin' Studio

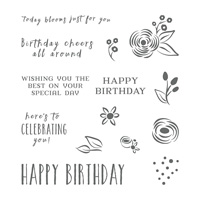
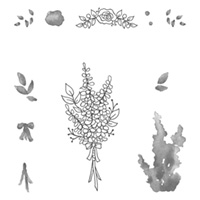
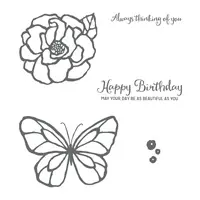
The only thing that doesn’t come in the kit is the Perennial Birthday stamp set, but don’t worry, that’s sold on the same page and you can use the stamp set for the kit as well as on and on after you’ve finished the kit.

Stampin' Up!, Perennial Birthday stamp set, Stampin' Studio

Once I made one of each of the four cards in the kit, I took the rest of the supplies and made 12 other cards.  They look so good together don’t you think?  Come on back tomorrow and show you close up photos of the other 12 cards, so you too can continue to create with this amazing kit.

Stampin' Up! Perennial Birthday Project Kit, Perennial Birthday stamp set, Stampin' Studio

Supply List

Brusho Crystal Colour Technique: Sprinkle & Spritz

Today’s Brusho Crystal Colours Technique card actually features two techniques.  The background is Sprinkle & Spritz and the flowers are painting.  Let me explain how these differ from my past techniques.

Stampin' Up! Lots of Lavender stamp set, Brusho Crystal Colour, Stampin' Studio

Once again I used Watercolor Paper, but this time I started by sprinkling the Blue Brusho on dry paper then lightly misted the paper with the Stampin’ Mister and water.  It gives a completely different look than my Spritz & Sprinkle technique.  Once this dried, I stamped the image from the Lots of Lavender stamp set in Basic Black Ink.  Next I tapped a little of the Blue Brusho on a clear acrylic block and used my Aqua Painter to pick up a little of the powder.  I used this to paint the flowers.  For the leaves and stems I combined a bit of the blue and green Brusho to achieve a Garden Green color which looks great with the Garden Green Satin Ribbon.  I finished the card off with a Basic Black mat behind the focal image and layered it on a Marina Mist card base which I ran though the Petal Pairs Embossing Folder twice for an allover texture.

Look at how different and lovely all of my stampers cards turned out.  I am so in love with Brusho Crystal Colours and the variety of ways you can use it.  If you haven;’t tried it yet, I encourage you to get some and give it a try.

Stampin' Up! Lots of Lavender stamp set, Brusho Crystal Colour, Stampin' Studio

I’d love to hear your comments on which technique you like the most.

You can view my other Brusho Techniques by clicking 

Brusho Crystal Colour Bubble Wrap Technique

Brusho Crystal Colour Spritz & Sprinkle Technique

Brusho Crystal Colour Sprinkle & Paint Technique

Shopping List:

Brusho Crystal ColourTechnique: Sprinkle & Paint

I’m back with another Brusho Crystal Colour Technique.  I call this one Sprinkle & Paint.

Stampin' Up! Beautiful Day stamp set, Brusho Crystal Colour, Stampin' Studio

I did some heat embossing with the Copper Embossing Powder and the sentiment and the butterfly from the Beautiful Day stamp set.  Next I sprinkled Brusho on the butterfly using yellow Brusho around the outer edges, Orange in the middle of the wings and the Red towards the inside of the butterfly.  Then, with the Aqua Painter, I carefully painted the individual sections of the butterfly being sure to clean the Aqua Painter of any lingering color before I went onto the next section.  This really gave a “stained glass” look to the image.

Once again, everyone at my Brusho Techniques Class used the same method to create their card, but you can see below how differently each turned out.  Aren’t they stunning?

Stampin' Up! Beautiful Day stamp set, Brusho Crystal Colour, Stampin' Studio

I’ve got one more technique using Brusho that I’ll be sharing.  If you missed my previous posts featuring techniques with Brusho please click HERE and HERE

Shopping List for today’s card