How to celebrate with many metallic elements

Stampin' Up! Here's to Cheers stamp set, Stampin' Studio

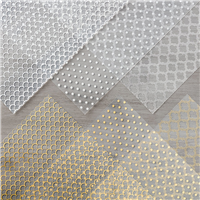
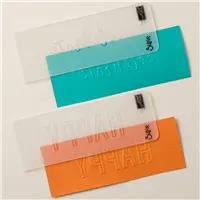
The other day I was playing around in my Stampin’ Studio and came across an unopened package of the Fabulous Foil Designer Acetate.  I decided it was time to create something fun with this special “paper”.  These are 12″ x12″ Acetate sheets (like our Window Sheets) only these have stunning designs printed on them.  There are 3 different designs and you get 2 of each sheet.  Another great thing about these sheets is that they’re reversible!  That’s right, they’re Silver on one side and gold on the other, so it really allows for a lot of versatility.  I decided to go silver for the first card.

Today’s Color Palette

Today's Color Palette 4-8-17jpg

Let’s Take a Closer Look

Stampin' Up! Here's to the Cheer stamp set, Fabulous Foil Designer Acetate, Stampin' Studio

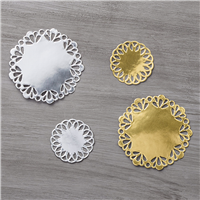
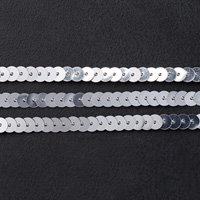
Sticking with a sliver theme, I used the sentiment from Here’s to Cheers stamp set and did some heat embossing.  I then layered it onto one of the large silver Metallic Foil Doilies.  Isn’t that fun?  I also added some Silver Sequin Trim for a bit more sparkle and shine.  Check out the Gold version too!

Stampin' Up! Here's to Cheers stamp set, Fabulous Foil Designer Acetate, Stampin' Studio

And look… I decided I wanted to try it with Copper, so I stamped a Gold Doily with the VersaMark Pad and sprinkled Copper Embossing Powder over the doily, then heat set it with the Heat Tool.  How cool is that to have a copper doily too!  Makes you want to order up a bunch of those Metallic Foil Doilies doesn’t it?

Copper Embossed Metallic Doilies

Stampin’ Studio Tips

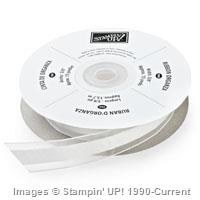
  • Measurements: Smoky Slate: 4-1/4″ x 9-3/4″ score at 5-1/2″. Whisper White: 4″ x 5-1/4″ and 4″ x 4″ and 2-1/2″ x 2-1/2″ for circle die cut. ⦁ Fabulous Foil Designer Acetate : 4″ x 4″. 5/8″ Organza Ribbon: 5-1/2″. Silver Sequin Trim: 5-1/2″
  • Tips:  Roll up a Mini Glue Dot and put on each corner of the Fabulous Foil. Designer Acetate sheet (hiding it under the printed design). Attach the acetate to the 4″ x 4″ Whisper White cardstock.Wrap the Organza Ribbon around the center of the front acetate & white cardstock layer and secure to the back side with mini glue dots. ⦁ Wrap the Sequin Trim over the Organza Ribbon and secure to the back side with mini glue dots. ⦁ Attach this layered piece to the front panel of the card. ⦁ Attach the 5-1/4″ x 4″ piece of Whisper White cardstock to the inside of the card. ⦁ Rub the Embossing Buddy over the 2-1/2″ x 2-1/2″ piece of Whisper White cardstock to remove the static from the paper. ⦁ Stamp the image in VersaMark ink.  ⦁ Sprinkle Silver Stampin’ Emboss Powder over the stamped image.  ⦁ Pour off excess powder and heat emboss with the Heat Tool. ⦁ Once the embossed image has cooled, cut the image out using the Layering Circles Framelits (use the 5th from the larges framelit) ⦁ Attach the embossed image to the large Silver Doily with Snail Adhesive. ⦁ Attach Stampin’ Dimensionals to the back of the doily and attach to the front panel of the card so that it hangs over the panel edge being careful to not attach it to the inside panel of the card.

Stampin' Up! Here's to the Cheer stamp set, Fabulous Foil Designer Acetate, Stampin' Studio

Supply List:

Price: $110.00

Happy Celebrations with Celebrations Duo Embossing Folders

Stampin' Up! Happy Celebrations stamp set, Celebrations Duo Embossing Folder, Stampin' Studio

My Stampin’ Sisters Express Team is amazing and we have many reasons to celebrate, so I was in mass production mode and made cards for team members that had outstanding sales during Sale-a-bration.  I used the Happy Celebrations stamp set with the coordinating Celebrations Duo Embossing Folders.

Stampin' Up! Happy Celebrations stamp set, Celebrations Duo Embossing Folder, Stampin' Studio

I decided to go with a monochromatic color scheme of blues.

Today’s Color Palette

Today's Color Palette 4-7-17

Let’s Take a Closer Look

Stampin' Up! Happy Celebrations stamp set, Celebrations Duo Embossing Folder, Stampin' Studio

I love the Celebrations Duo Embossing Folders because they come in a set of two and rather than having a raised image when you’re done embossing, we end up with a “debossed” image (them image is pushed down into the cardstock rather than raised.  This makes it perfect for stamping various colors of circles over the debossed image and what we end up with is a “resist” image that doesn’t pick up the ink!  The circle image and the sentiments come from the Happy Celebrations stamp set.

Stampin' Up! Happy Celebrations stamp set, Celebrations Duo Embossing Folder, Stampin' Studio

Here we’ve got the same card, I’ve just swapped out the sentiment and I used the other Celebration Duo folder and turned it into a birthday card.

Stampin’ Studio Tips

  • Tips: Stamp the circles starting with the lightest color first (Soft Sky) then medium (Pool Party) and finally the darkest color (Bermuda Bay)
  • Sizes: Pool Party card stock is 5-1/2″ x 8-1/2″ scored at 4-1/4″.  Bermuda Bay cardstock is 5-1/8″ x 3-7/8″.  Whisper White is 5″ x 3-3/4″ and 1/2″ x 2″ for banner

Stampin' Up! Happy Celebrations stamp set, Celebrations Duo Embossing Folder, Stampin' Studio

To purchase the supplies to make this card please click on the pictures below.

Happy Birthday Peggy

Sisters

Today is my sister Peggy’s birthday.  I’ll be good and won’t share her age (since she’s only 1-1/2 years older than me).  Not only is she my big sister, she’s my only sister and my best friend.  She’s also my first team member and today is her 13th anniversary with Stampin’ Up!  What a day to celebrate!

Stampin' Up! Birthday Banners stamp set, Timeless Tags Thinlits, Stampin' Studio

I wanted to make a birthday banner on the card and there are quite a few stamp sets I could have gone with but I decided to use the set appropriately named Birthday Banners.  I love the little stitching on the banner and how it ties in with the Stitched Shapes Framelits used to frame up the focal point.  I felt that the Succulent Garden Designer Series Paper with all of the spring colors  provided the perfect background for the card.

Today’s Color Palette

Today's Color Palette 4-6-17.pg

Let’s Take a Closer Look

Stampin' Up! Birthday Banners stamp set, Timeless Tags Thinlits, Stampin' Studio

After stamping the banner in Sahara Sand ink and the sentiment in Watermelon Wonder, I used the coordinating Bunch of Banners Framelits to cut the banner out, then popped it up with some Stampin’ Dimensionals.  For the tiny little butterflies, I used the Timeless Tags Thinlits Dies and cut them out in Watermelon Wonder, Flirty Flamingo, and Blushing Bride and adhered them with the Multi-purpose glue.

142755 Timeless Tags Thinlits Dies

142755 Timeless Tags Thinlits Dies

Stampin’ Studio Tips

  • Tips: Adding the band of 5/8″ Watermelon Wonder Mini Striped Ribbon helps the eye follow the focal point amongst the busy background paper.
  • Sizes: Watermelon Wonder cardstock is 4-1/4″ x 11″ scored at 5-1/2″.  Whisper White cardstock is 4″ x 5-1/4″.  Succulent Garden DSP is 3-7/8″ x 5-1/8″.  Scraps of Sahara Sand, Watermelon Wonder, Flirty Flamingo,  Blushing Bride, and Whisper White were used for the elements on the card.

Stampin' Up! Birthday Banners stamp set, Timeless Tags Thinlits, Stampin' Studio

Just a reminder that some of the items like the Watermelon Wonder cardstock, ink and ribbon will be on the retiring list that comes out on Monday, April 10th, so if you want to make sure you have them, order them before the list is posted because they’ll likely sell out within the first day or two after the list posts.

To order the supplies to make this card click on the pictures below

Price: $110.00