Peaceful Cabin Framed Art

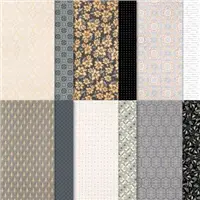
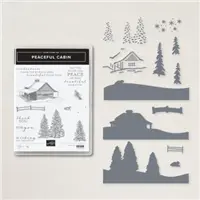
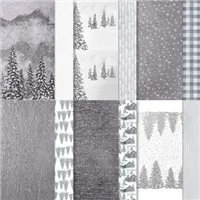
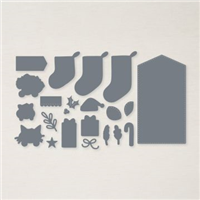
I created this Peaceful Cabin Framed Art piece for a demonstrator event we had a few weeks ago.  It was a big hit at the event and I thought you might all enjoy the project as well.  The Frame is an 8″ x8″ Shadow Box frame and the Peaceful Place Designer Series Paper, the Peaceful Cabin stamp set and the coordinating Cabin Dies were used.

Stampin' Up! Peaceful Cabin stamp set, Cabin Dies, Peaceful Place Suite, Stampin' Studio

This is one of those projects that is so much better in person.  To give the illusion of depth, I popped every layer up with lots of Stampin’ Dimensionals and also added Wink of Stella to all trees, cabin roof and snow around cabin.  the banner that the sentiment is stamped on is from the Stockings Dies, but everything else is from the Peaceful Cabin Bundle.

Measurements:

 Thick Basic White: 8” x 8”

Basic Black: 6-1/2” x 6-1/2”

Peaceful Place Designer Series Paper (snowflake print) 6” x 6”

Basic White:  6” x 5” for trees

                   6” x 3-1/2” for cabin

                   8-1/2” x 3” for extra trees and fences

                   2-3/4” x 2-1/2” for banner

Instructions:

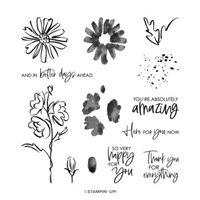
  1. Stamp sentiment on banner in Memento ink
  2. Stamp trees on 6” x 5” piece of Basic White positioning the trees as shown in photo then die-cut with corresponding die. Use Paper Snips to finish cutting out any area not cut by die
  3. Stamp Cabin on 6” x 3-1/2” piece of Basic White positioning the cabin as shown in photo then die-cut with corresponding die. Use Paper Snips to finish cutting out any area not cut by die
  4. On the 8-1/2” x 3” piece of Basic White stamp 2 sets of trees and 2 of the fences then die-cut with corresponding die. Use Paper Snips to finish cutting out any area not cut by die
  5. Attach Basic Black to Thick Basic White with lots of Dimensionals
  6. Attach Snowflake print to Basic Black with lots of Dimensionals
  7. Attach banner to Snowflake print with Dimensionals
  8. Attach “trees” layer to snowflake print with lots of Dimensionals lining up the sides and lower edge
  9. Attach “cabin” layer to “tree” layer with lots of Dimensionals lining up the sides and lower edge
  10. Attach Fences to each side as shown with Dimensionals
  11. Attach extra trees by fences with Dimensionals
  12. Paint Wink of Stella on all trees, cabin roof and snow around cabin
  13. Place your creation in an 8” x 8” Shadow Box Frame 

Stampin' Up! Peaceful Cabin stamp set, Cabin Dies, Peaceful Place Suite, Stampin' Studio


Stampin' Up! Peaceful Cabin stamp set, Cabin Dies, Peaceful Place Suite, Stampin' Studio

You can order the supplies for today’s card by clicking the products below which will take you directly to my online store.  

Supply List

Thank you for taking time to visit my blog, for shopping with me and for your loyalty to Stampin’ Studio!  I know there are a lot of demonstrators out there to choose from… THANK YOU for choosing me!  To show my appreciation, I have something special for you!  When you use the Host Code on your order, you earn rewards from me! Place an order of $30 or more using my current host Code and you’ll receive 3 card project tutorials that you will not see featured on my blog.

CURRENT HOST CODE: Use this host code to place your online order.  If your order is over $150 DO NOT use the code – you’ll get your own Stampin’ Rewards from Stampin’ Up! and you’ll still get the project tutorials from me.  Just copy/paste this code:  DQYYP93Q when placing your order.


FOLLOW ME….

Simply Elegant Foil Card

I pulled out the Simply Elegant Designer Series Paper because I haven’t used it in a long while.  Man oh man, this paper is over the top gorgeous!  I let the paper do the speaking on this card and the only thing that is stamped is the sentiment from the Color & Contour stamp set.

Stampin' Up! Color & Contour stamp set, Simply Elegant DSP, Stampin' Studio

Color Combo

The photo of the prints in the Simply Elegant Specialty Designer Series Paper is gorgeous, but wait until you see it in person…so stunning with Gold, Copper & Silver Foiling on the papers.  It coordinates with Basic Black, Basic Gray, Very Vanilla and of course Gold, Copper & Silver.

Stampin' Up! Simply Elegant DSP, Stampin' Studio

Remember the post where I said the Scalloped Contour Dies really need to be in your arsenal of “go to” products (see that post HERE).  Here is a photo of the full Scalloped Contours Dies.

Stampin' Up! Scalloped Contours Dies, Stampin' Studio

The other product I really want you to check out is the Tailor Made Tags Dies.  I used these on the sentiment tag and it makes for an adorable place to stamp the sentiment. One thing you can’t see on the photo is that the tags all have stitching around them as does the Scalloped Contours Dies.  I love that!

Stampin' Up! Tailor Made Tags Dies, Stampin' Studio

You can order the supplies for today’s card by clicking the products below which will take you directly to my online store.  

Supply List

Thank you for taking time to visit my blog, for shopping with me and for your loyalty to Stampin’ Studio!  I know there are a lot of demonstrators out there to choose from… THANK YOU for choosing me!  To show my appreciation, I have something special for you!  When you use the Host Code on your order, you earn rewards from me! Place an order of $30 or more using my current host Code and you’ll receive 3 card project tutorials that you will not see featured on my blog.

CURRENT HOST CODE: Use this host code to place your online order.  If your order is over $150 DO NOT use the code – you’ll get your own Stampin’ Rewards from Stampin’ Up! and you’ll still get the project tutorials from me.  Just copy/paste this code: GNHXHED4 when placing your order.


FOLLOW ME….


Celebrating with Sweet Farewell stamp set

Today I am celebrating two of my team members with this card I created using the Sweet Farewell stamp set.  Every year Stampin’ Up! offers all demonstrators an opportunity to earn an all expense paid trip for two to various locations around the world.  The most recent trip we were able to earn is a week long cruise to the Western Caribbean on the Royal Caribbean’s Symphony of the Seas. I am so excited that next May, Dave and I will get to travel with my sister, Peggy Murwin and her husband Tony and my good friend Amanda Waldhart and her husband Chris.  Peggy, Amanda and I have earned the annual trips year after year (thanks to our loyal followers like you) and we love traveling together, so I wanted to create something that honored our love of travel.

Stampin' Up! Sweet Farewell stamp set, Pattern Party DSP, Stampin' Studio

Color Combo

I chose to use the Pattern Party Designer Series Paper, (which is an exclusive host product) because of the bright and festive color combination.  Next I used the Scalloped Contours Dies with Bermuda Bay card stock – if you don’t own this set of dies, let me just say, you NEED to get it!  I use these dies more than any other.  They add a special pop to anything you want to mat.

All of the adorable images and the sentiment come from the Sweet Farewell stamp set and were stamped in Memento Ink and colored in with Stampin’ Blends before doing a bit of “fussy cutting” and popping them up with Dimensionals.  For the Bon Voyage banner I colored markers directly onto the red rubber stamp before stamping it on the banner.

Don’t you think the card itself would make a cute embellishment on a travel scrapbook page?  By the way, you can choose the Pattern Party Paper with a party order or individual order of $150 or more.

You can order the supplies for today’s card by clicking the products below which will take you directly to my online store.  

Supply List

Thank you for taking time to visit my blog, for shopping with me and for your loyalty to Stampin’ Studio!  I know there are a lot of demonstrators out there to choose from… THANK YOU for choosing me!  To show my appreciation, I have something special for you!  When you use the Host Code on your order, you earn rewards from me! Place an order of $30 or more using my current host Code and you’ll receive 3 card project tutorials that you will not see featured on my blog.

CURRENT HOST CODE: Use this host code to place your online order.  If your order is over $150 DO NOT use the code – you’ll get your own Stampin’ Rewards from Stampin’ Up! and you’ll still get the project tutorials from me.  Just copy/paste this code: GNHXHED4 when placing your order.


FOLLOW ME….